It is recommended in most cases to create a Nature Asset to set up your materials and meshes. However, sometimes you'll need to set up or edit a material manually. In this article you can find an overview of the most important settings:
Step 1: Select a shader for your material
Nature Shaders is a collection of shaders that you can use for your materials. So the natural first step is to select one of the shaders for your material.
Select your material, and change the shader to one of the following:
- Nature Shaders/Grass
- Nature Shaders/Plant
- Nature Shaders/Tree Leaves
- Nature Shaders/Tree Bark
- Nature Shaders/Tree Billboard
Note: For the High-Definition render pipeline, the shaders are located in the "HDRP" sub-category. For the Universal render pipeline, the shaders are located in the "Universal Render Pipeline" sub-category.

Each shader represents a different type of object, and should be selected for the corresponding object type:
- Plant
- The "Plant" shader is the most versatile and can be used for most objects.
- Grass
- "Grass" has a slightly different behavior that is more optimized for grass patches. Most notably, it has more wind variation within the object and recalculates normals when bending in the wind.
- Tree Leaves and Tree Bark
- The tree shaders should only be used for trees. They are optimized for more complex wind animations, including bending of the trunk.
- Tree Billboard
- Should only be used for Unity's Billboard Assets.
Step 2: Assign textures
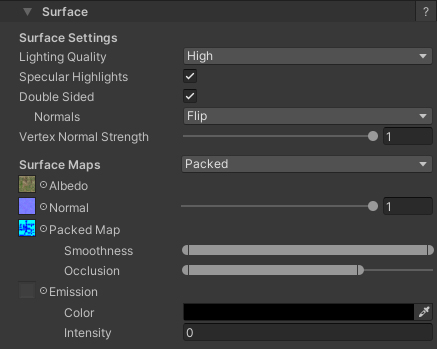
Most likely your material will already have assigned textures, but you may have to re-assign them. The texture fields that are available depend on the Surface Maps that are selected. "Metallic Gloss" uses the same textures as the built-in render pipeline and URP. "Packed" uses the same textures as HDRP.
Read more in the Material Editor article.
- Double Sided
- Enable to render both the front- and back-side of triangles.
- Normals
- Set the behavior for the normals of double-sided triangles. "Same" applies the same normals to both sides, "Flip" will flip the normals for the backside.
- Albedo
- A texture containing the base color for the material.
- Normal
- A texture containing the normal map for the material. Adjust the normal strength with the slider.
- Glossiness, Metallic
- A texture containing the smoothness/roughness and metallic values of the material. Use the slider to remap the smoothness/roughness. The channels use the same format as the mask map (see the table below).
- Occlusion
- A texture containing the occlusion of the material. Use the slider to remap the occlusion.
- Packed Map
- The mask map contains four grayscale textures, one in each of its color channels. Use the Smoothness and Occlusion properties to remap the values of the textures.
Color channel Map Red Metallic Green Occlusion Blue Reserved for future use Alpha Smoothness
Step 3: Mesh Data
The mesh settings are used to determine the shape and size of the mesh, which is used to calculate wind and interaction. It is important that these settings are accurate, otherwise the object may end up stretching or glitching.
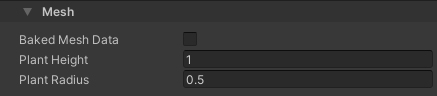
- Baked Mesh Data
- Enable if the data for the mesh is baked in the vertices of the mesh. Create a Nature Asset to bake the data for the mesh. Baked data is much more accurate and results in higher quality wind and interaction.
- Height
- The height of the object that this material is used for.
- Radius
- The radius of the object that this material is used for.
Step 4: Enable Features
All other properties should give good results with their default values. You can enable additional features for the material by enabling (or disabling) the following sections:
- Wind
-
If the section is enabled then the material will have wind animations. (Enabled by default)
More info in the Material Editor article and Wind article.
- Overlay
-
If the section is enabled then the material will sample the color and alpha from Nature Overlays in the scene.
More info in the Material Editor article and Overlay article.
- Interaction
-
If the section is enabled then the material will interact with other objects in the scene.
More info in the Material Editor article and Interaction article.
- Translucency
-
If the section is enabled then the material will simulate light shining through the object. This results in better lighting for grass and leaves.
More info in the Material Editor article.